Sunday, February 20, 2011

Phase 2: continued...


This is the stove perched on the ledge I built, to take weight off of 
hooks. It feels very sturdy and I will not have any concerns about the stove falling
 into the tub. 


This is a cage to enclose the stove, it will prevent me from burning my knee
if I forget to keep my distance. (not complete yet)


Here is another view, i originally was going to put the stove in the middle of the 4 foot side but it divided the space up very awkwardly. Having it in the corner will allow for two to comfortably sit but i think that three possibly four people could fit.


Not to shabby looking considering it is $45 worth of lumber and $30 worth of scrap steel.

I have the task of moving the tub to the garage, so it can dry out fully (after a week of almost non stop rain/wetness). I am most likely going to use an oil based "topside gloss black" marine paint from Home Depot. It only needs two coats and it doesn't need to be primed. 

Sunday, February 13, 2011

Phase 2: finishing the stove and building the tub


Here is the stove painted in a semi-gloss black engine block spray paint. If the dust was wiped off you would see that the paint is thin on the larger panels, it really needed a a good priming, but o well...

+++++++++++++++++++  Phase 2: the tub  ++++++++++++++++++++++++++++++++++++++

materials/tools: 
      -                      Two sheets of 7/16 plywood
- five 2X4s 
     - outdoor wood glue
      -1", 2"and 3" wood screws
    - (power saw, cordless drill)


                                                         Day one of the build

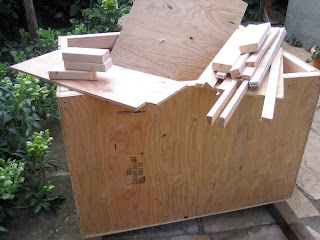
the tub's dimensions roughly 48"long X 36"wide X 32" deep, its approximate 
capacity is 230 gallons empty

The tub is just a little too deep to sit in with out some kind of stool/seat, at least from my initial test (which was performed by me sitting at the bottom of my wood box in my backyard like a weirdo, lol)  if I built another one of these I would have made the base height 27-30 inches or gone up to 38, right now I feel it could have the worst of both options. 


day two of the build: structurally the tub is almost complete, all it needs is two floor beams to make the floor rigid. 

Next steps: 
- Finish limited wood work
-Water proof cocking along seems
- Oil based primer, matt black paint

Wednesday, February 2, 2011

Building the stove: the beginning stages


Went to the local steel yard and picked up a 39"X 35"sheet of 10 or 12 gauge (cant tell, and it doesn't really matter) mild steel. I also bought a 2' 1/2 foot section of square tubing for the chimney, the two pieces together cost $30. 


Here are the main tools used so far that not everyone might have in there garage. The top picture is of a Harbor Freight Flux core 90 amp welder, it only has two heating settings (min, max) which operate at 60 amps and 80 amps respectively. When I was welding the sheet metal I used the Max setting and a "7/10" wire speed. I might have had the wire speed a little high because I had a lot of excessive splatter but it got the job done. 

On the bottom picture there is a Harbor freight adjustable Auto darkening mask (critical for all the tack welding involved). Next to the mask is a 4 1/2 inch cut-off wheel, which cut all of the pieces for the stove.
                     *Always wear at least a dust mask like the white one shown above, while using the cut off wheel (even in open air environments). I didn't wear a mask for the initial cuts and ended up coughing up black luges for 3 days. 


This was my first test piece and is quite an ugly weld. It's going to be a learn as I go experience.


this is the stove tacked up and basically together. If you have a way to cut clean holes for heating tubes like more expensive heaters have, i would recommend it for efficiency purposes.


this is the top and bottom of the air duct, which allow for ideal air flow. (yes this is identical to the snorkel/scuba heater but Hey why re invent the wheel.) There is approximately 10 cubic inches of air flow possible for combustion.
        - The rebar was added in to fill a large gap due to inaccuracies while cutting with the cut- off wheel.


This is almost a finished stove, the edges need to be cleaned up with a grinder, I also need fill any potential pin holes in the welds and give it a good high temperature enamel paint job to seal the water out.

the single stack was cut in half to double the displacement to 12.6 cubic inches. hopefully the smoke stack will not make the hot tubing experience too smokey, because the two are only 1' 3" inches tall.


By the end of the project, i could make a pretty good bead, but its still nothing to brag about. Flux core welding makes much uglier welds in comparison to true MIG welding.